

How To Add Subscriber Registration On Bluehost Wordpress Blog

To begin, make sure that the WooCommerce registration forms are enabled on the account login page. For this, go to WooCommerce > Settings > Accounts and check Enable customer registration on the "My account" page.
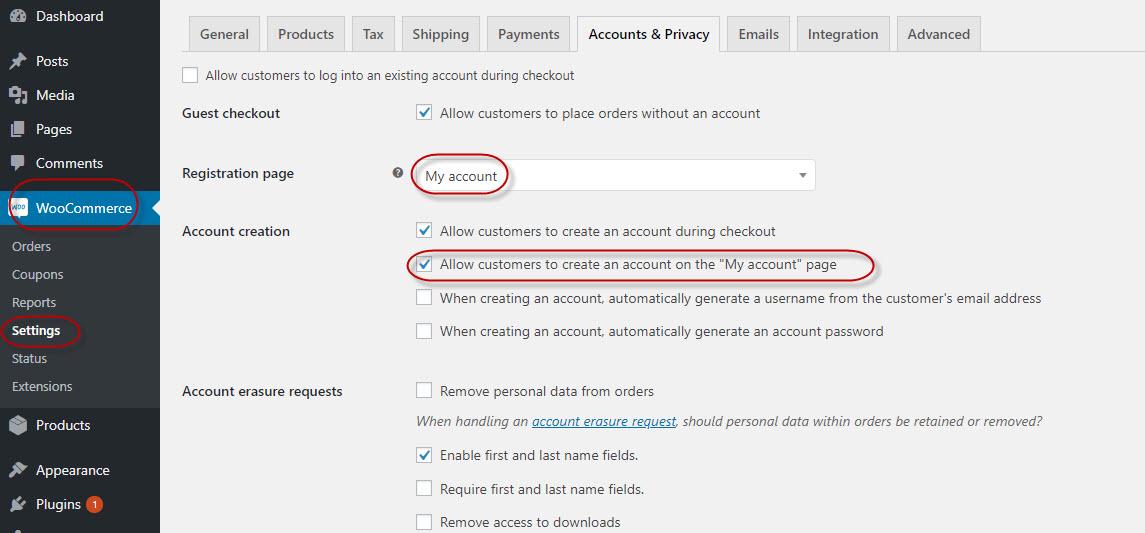
After enabling this option, you can see the WooCommerce registration form at the frontend.
As should be obvious it is a pretty modest WooCommerce form, however, we can add more fields to this structure by utilizing the following actions. Presently, to include extra fields like first name, last name and phone number, and so on, include the following lines of code toward the end of your functions.php, which is located in your theme folder.
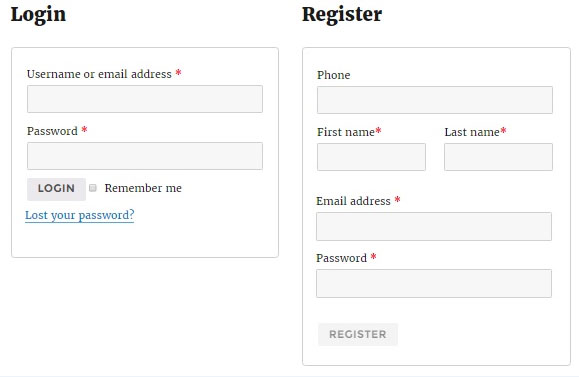
function wooc_extra_register_fields() {?> <p class="form-row form-row-wide"> <label for="reg_billing_phone"><?php _e( 'Phone', 'woocommerce' ); ?></label> <input type="text" class="input-text" name="billing_phone" id="reg_billing_phone" value="<?php esc_attr_e( $_POST['billing_phone'] ); ?>" /> </p> <p class="form-row form-row-first"> <label for="reg_billing_first_name"><?php _e( 'First name', 'woocommerce' ); ?><span class="required">*</span></label> <input type="text" class="input-text" name="billing_first_name" id="reg_billing_first_name" value="<?php if ( ! empty( $_POST['billing_first_name'] ) ) esc_attr_e( $_POST['billing_first_name'] ); ?>" /> </p> <p class="form-row form-row-last"> <label for="reg_billing_last_name"><?php _e( 'Last name', 'woocommerce' ); ?><span class="required">*</span></label> <input type="text" class="input-text" name="billing_last_name" id="reg_billing_last_name" value="<?php if ( ! empty( $_POST['billing_last_name'] ) ) esc_attr_e( $_POST['billing_last_name'] ); ?>" /> </p> <div class="clear"></div> <?php } add_action( 'woocommerce_register_form_start', 'wooc_extra_register_fields' ); Now if you refresh the page, you'll see the fields being added to WooCommerce registration form.
To relate these registration form fields with the billing address, you have to include the prefix "billing_" before the field name. The following is a list of all the valid WooCommerce form fields that can be added to the registration form and can be associated with a billing address.
- billing_first_name
- billing_last_name
- billing_company
- billing_address_1
- billing_address_2
- billing_city
- billing_postcode
- billing_country
- billing_state
- billing_email
- billing_phone
Now we also need to validate these newly added form fields. To validate these structure fields, include the accompanying lines of code toward the end of your functions.php file which located in the theme folder.
/** * register fields Validating. */ function wooc_validate_extra_register_fields( $username, $email, $validation_errors ) { if ( isset( $_POST['billing_first_name'] ) && empty( $_POST['billing_first_name'] ) ) { $validation_errors->add( 'billing_first_name_error', __( '<strong>Error</strong>: First name is required!', 'woocommerce' ) ); } if ( isset( $_POST['billing_last_name'] ) && empty( $_POST['billing_last_name'] ) ) { $validation_errors->add( 'billing_last_name_error', __( '<strong>Error</strong>: Last name is required!.', 'woocommerce' ) ); } return $validation_errors; } add_action( 'woocommerce_register_post', 'wooc_validate_extra_register_fields', 10, 3 ); On the off chance that you like into the code of this function, you'll make sense that it is simply checking $_POST array for form values and including an error message if a value is not present or invalid data.
Cloudways Platform is Built for WooCommerce Stores!
Over 55+ built-in features to improve development workflows and site speed.
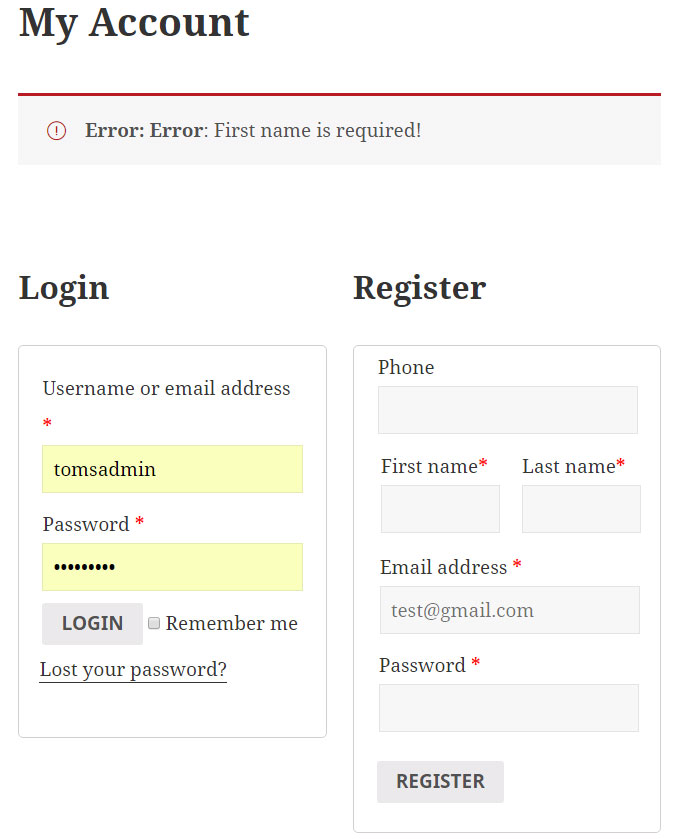
Along these lines, you can likewise include various validation rules and you also add validation rules to different fields as well. You can see one of our custom validation rules being applied:
At long last, we need to save these values to the database.
To insert values in database add the following function in your theme's functions.php file:
/** * Below code save extra fields. */ function wooc_save_extra_register_fields( $customer_id ) { if ( isset( $_POST['billing_phone'] ) ) { // Phone input filed which is used in WooCommerce update_user_meta( $customer_id, 'billing_phone', sanitize_text_field( $_POST['billing_phone'] ) ); } if ( isset( $_POST['billing_first_name'] ) ) { //First name field which is by default update_user_meta( $customer_id, 'first_name', sanitize_text_field( $_POST['billing_first_name'] ) ); // First name field which is used in WooCommerce update_user_meta( $customer_id, 'billing_first_name', sanitize_text_field( $_POST['billing_first_name'] ) ); } if ( isset( $_POST['billing_last_name'] ) ) { // Last name field which is by default update_user_meta( $customer_id, 'last_name', sanitize_text_field( $_POST['billing_last_name'] ) ); // Last name field which is used in WooCommerce update_user_meta( $customer_id, 'billing_last_name', sanitize_text_field( $_POST['billing_last_name'] ) ); } } add_action( 'woocommerce_created_customer', 'wooc_save_extra_register_fields' ); And we are done here! Now the recently added fields have been added, validated, and inserted for future use.
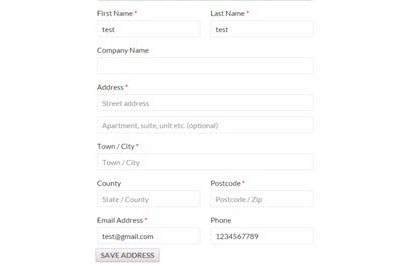
On the billing address page in your account, you need to click on edit to go there. You can see the values from the registration form already being populated.
WooCommerce Edit My Account Page – An Alternative Method
If you wish to use an alternative method for registering WoOCommerce form fields, you can use WooCommerce hooks to edit WooCommerce my account page.
The following code snippet illustrates the process:
function woocommerce_edit_my_account_page() { return apply_filters( 'woocommerce_forms_field', array( 'woocommerce_my_account_page' => array( 'type' => 'text', 'label' => __( 'Socail Media Profile Link', ' cloudways' ), 'placeholder' => __( 'Profile Link', 'cloudways' ), 'required' => false, ), ) ); } function edit_my_account_page_woocommerce() { $fields = woocommerce_edit_my_account_page(); foreach ( $fields as $key => $field_args ) { woocommerce_form_field( $key, $field_args ); } } add_action( 'woocommerce_register_form', 'edit_my_account_page_woocommerce', 15 ); Here's how the outcome of the snippet would look like:
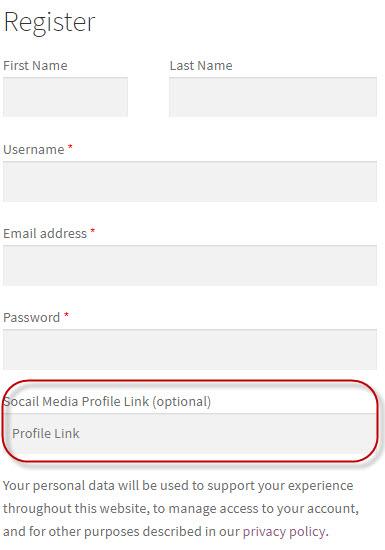
The above snippet starts with the woocommerce_edit_my_account_page() that is used in the later part of the snippet. This function returns a multidimensional array that contains the information about the fields (type, label, placeholder, required or not) that you are adding to the form.
To ensure that the values of the fields can be updated further on, the array is further processes through the woocommerce_form_field() function.
in the next half of the snippet, I have used the edit_my_account_page_woocommerce() function. As you can see the $fields variable contains the array generated by the woocommerce_edit_my_account_page() function. This is looped through using the foreach() loop.
Take a Chance With Cloudways
Try out the demo first before you decide.
Adding Your Required WooCommerce Form Field
As you can see this above mentioned snippet is very flexible and you can add any field type that you wish by providing the appropriate field structure value in the $fields array.
Here are a few examples:
Textarea
'woocommerce_my_account_page' => array( 'type' => 'textarea', 'label' => __( 'Socail Media Profile Link', 'cloudways' ), 'placeholder' => __( 'Profile Link', 'cloudways' ), 'required' => false, ),
checkbox
'woocommerce_my_account_page_checkbox' => array( 'type' => 'checkbox', 'label' => __( 'Checkbox', 'cloudways' ), ),
Option list
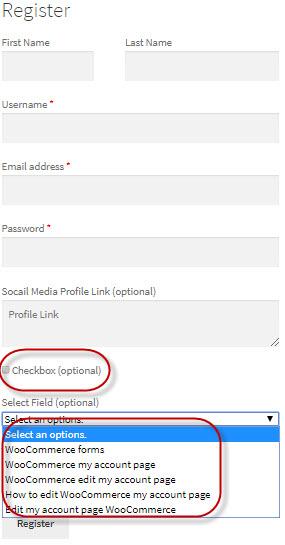
'woocommerce_my_account_page_select' => array( 'type' => 'select', 'label' => __( 'Select Field', 'cloudways' ), 'options' => array( '' => __( 'Select an options.', 'cloudways' ), 1 => __( 'WooCommerce forms', 'cloudways' ), 2 => __( 'WooCommerce my account page', 'cloudways' ), 3 => __( 'WooCommerce edit my account page', 'cloudways' ), 4 => __( 'How to edit WooCommerce my account page', 'cloudways' ), 5 => __( 'Edit my account page WooCommerce', 'cloudways' ), ),
Here's how these options would look like in the form:
You can save these values in the function wooc_save_extra_register_fields(), mentioned above.
Q. How do I show a registration form in WooCommerce?
To do this go to WooCommerce → Settings → Accounts → Registration Options. Now here you need to enable the option called "Enable registration on the "My Account" page".
Q. How do I display custom fields in WooCommerce?
For this you need to install WooCommerce product table plugin then go to WooCommerce → Settings → Products → Product Tables and choose the settings for your product tables. Open the 'Edit Product' screen for the product where you want to add a table of custom fields. Add a product table shortcode to the Short Description field.
Q. How do I add product data to WooCommerce?
The Product Data meta box is where the majority of important data is added for your products. To do this go to WooCommerce → Products → Add New. Scroll down the Product Data section. Here you can add your product detail.
Q. How to add CAPTCHA in WooCommerce registration form?
Go to WooCommerce Dashboard → Plugins → Add New, then search Captcha Recaptcha for WooCommerce after that install now this plugin and activate.
Conclusion
This tutorial allows the users to add extra WooCommerce form fields in registration page which is My Account page of WooCommerce. So, now you can add more fields other than firstname, lastname and contact fields. You may also make them mandatory fields.
I hope you found the article helpful. Let me know in the comments if you've got any questions, and I'll get back to you!
Share your opinion in the comment section. COMMENT NOW
Share This Article
Customer Review at ![]()
"Great performance for the price, and plenty of control"
Sean P [SMB Owner]

Owais Alam
is the WordPress Community Manager at Cloudways - A Managed WooCommerce Hosting Platform and a seasoned PHP developer. He loves to develop all sorts of websites on WordPress and is in love with WooCommerce in particular. You can email him at [email protected]
How To Add Subscriber Registration On Bluehost Wordpress Blog
Source: https://www.cloudways.com/blog/add-woocommerce-registration-form-fields/
Posted by: simmonsshavinicaut.blogspot.com
0 Response to "How To Add Subscriber Registration On Bluehost Wordpress Blog"
Post a Comment